Contents
When water damage strikes, quick and efficient mold remediation is key to preventing health issues and further damage to your home. You’ll need to start by identifying the affected areas and ensuring proper ventilation to minimize moisture. It’s important to wear protective gear to safeguard yourself during the process. Once you’ve tackled the visible mold, you’ll want to focus on controlling humidity levels and monitoring for recurrence. But what specific steps can you take to ensure a thorough job? Let’s explore ten essential DIY tips that can make a significant difference.
Key Takeaways
- Conduct thorough inspections for visible mold growth, musty odors, and hidden moisture using moisture detection tools.
- Ensure proper ventilation by opening windows, using fans, and monitoring humidity levels (30%-50%) to prevent mold regrowth.
- Wear protective gear, including gloves, goggles, and an N95 respirator, to safeguard against mold exposure during cleanup.
- Clean affected surfaces with mold-specific solutions, scrubbing non-porous areas thoroughly and drying completely to inhibit future growth.
- Regularly monitor the area for signs of mold recurrence, including musty odors and water stains, to address issues promptly.
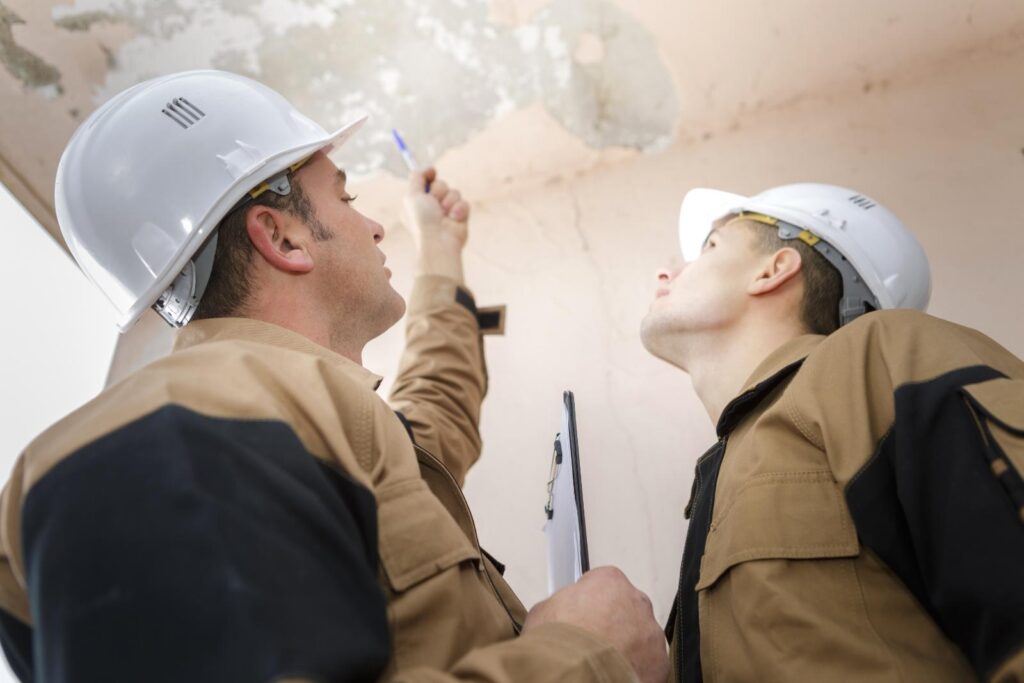
Identify Affected Areas
When tackling mold remediation, your first step is to identify the affected areas in your home. You’ll want to conduct a thorough inspection, using effective visual inspection techniques to spot any signs of mold growth. Look for discoloration, fuzzy patches, or any musty odors, which often indicate the presence of mold.
Don’t overlook hidden areas like behind walls, under carpets, or in crawl spaces; these are common breeding grounds.
For a more comprehensive assessment, consider utilizing moisture detection tools. These devices can help you pinpoint areas with elevated moisture levels, which are conducive to mold development. A moisture meter, for instance, allows you to measure the moisture content in building materials, providing you with concrete data to guide your remediation efforts.
By combining visual inspections with these tools, you’ll establish a clearer picture of the extent of the mold problem.
As you identify affected areas, document your findings. Take notes and photos to keep track of where you’ve seen mold or high moisture levels. This documentation will be invaluable as you strategize for effective remediation.
Remember, the sooner you identify these areas, the quicker you can take action to mitigate the issue. Your proactive approach not only helps protect your home but also fosters a healthier living environment for you and your loved ones.
Ensure Proper Ventilation
To effectively combat mold, you need to ensure proper ventilation in the affected areas.
Open windows and doors to create airflow, and strategically use fans to circulate air and reduce humidity.
This step is crucial in preventing mold from returning after remediation.
Open Windows and Doors
How can you effectively combat mold growth in your home? One of the simplest and most effective methods is to open windows and doors to allow fresh air to circulate. By creating an influx of outdoor air, you can significantly improve your indoor climate, reducing humidity and discouraging mold development.
When you open windows, you’re not just letting in fresh air; you’re also promoting a natural exchange that helps to dilute any mold spores present. This step is crucial, especially after water damage, as stagnant air can exacerbate moisture problems. Aim to keep these openings open for several hours each day, particularly during dry, breezy conditions.
It’s essential to consider the overall environment when ventilating. If outdoor humidity is high, you might need to close them temporarily until conditions improve. However, in most cases, prioritizing fresh air will aid in lowering the moisture levels indoors.
Incorporating this practice into your mold remediation strategy fosters a healthier home atmosphere, allowing you to reclaim your space from unwanted mold growth.
Use Fans Effectively
After ensuring adequate ventilation by opening windows and doors, using fans effectively can further enhance air circulation and moisture control in your home.
Start by strategically considering fan placement. Position fans in a way that directs airflow towards damp areas, helping to evaporate moisture more efficiently. For example, place one fan facing outwards in a window to expel humid air while another fan should be directed toward the wet surfaces to expedite drying.
It’s also crucial to monitor the airflow direction. You want to create a cross-breeze effect; this means positioning fans to pull in fresh air from one side of the room while pushing out the moisture-laden air from the opposite side. This method maximizes air exchange and reduces humidity levels more effectively than simply pointing fans in one direction.
Keep in mind that running multiple fans can amplify the drying process, but ensure they’re not too close to each other, as this can disrupt airflow.
Wear Protective Gear
When tackling mold remediation, prioritizing your safety with the right protective gear is crucial. Mold spores can be harmful, and exposure can lead to various health issues, especially if you’re sensitive or allergic. Equipping yourself properly can make a significant difference in your safety during the process.
Start by investing in high-quality protective clothing. This includes long-sleeved shirts and pants, which can shield your skin from spores. Avoid wearing clothes you love, as they might get contaminated. Additionally, safety goggles are essential to protect your eyes from irritating spores and dust.
Here’s a quick list of protective gear you should consider:
- N95 respirator mask: This filter will help you breathe easier by trapping airborne spores.
- Gloves: Use rubber or latex gloves to protect your hands while handling moldy materials.
- Boots: Waterproof boots can prevent mold spores from sticking to your shoes and getting tracked throughout your home.
Taking these precautions ensures that you’re protecting yourself from potential hazards.
Remember, mold remediation can stir up a lot of spores, so it’s always better to be safe than sorry. By wearing protective gear, you join a community of conscientious homeowners who value safety and health during their DIY projects.
Equip yourself with the right tools, and you’ll not only complete the job effectively but also minimize health risks along the way.
Remove Contaminated Materials
To effectively remove contaminated materials, start by identifying all affected areas in your home.
This includes inspecting walls, ceilings, and any porous items that may harbor mold.
Once you’ve pinpointed the problem spots, it’s crucial to follow proper disposal methods to ensure safety and prevent further contamination.
Identify Affected Areas
Start by thoroughly inspecting your home to identify affected areas where mold has taken hold. Mold thrives in damp environments, so it’s crucial to use effective mold detection techniques and moisture assessment tools to pinpoint problem areas. Look for visible signs of mold, but also consider hidden spaces that might harbor moisture.
Focus on these key areas:
Basements and Crawl Spaces: These areas often retain moisture, making them prime candidates for mold growth.
Bathrooms and Kitchens: Check around sinks, tubs, and appliances where leaks might occur.
Walls and Ceilings: Look for discolored spots or water stains that may indicate mold beneath the surface.
As you assess these areas, remember to take detailed notes. This will help you track the extent of mold damage and guide your remediation efforts.
Proper Disposal Methods
How can you ensure that contaminated materials are disposed of safely and effectively? Proper disposal is crucial in preventing mold from spreading further.
Start by identifying materials that can’t be salvaged, such as drywall, carpeting, or insulation that have been significantly affected by water and mold. These items often need to be classified as hazardous waste, requiring special handling.
Before disposing of these materials, check your local recycling guidelines. Some areas may permit recycling of certain materials, like metal or treated wood, if they’re free from contaminants.
For those that aren’t recyclable, contact your local waste management facility to learn about hazardous waste disposal options, ensuring compliance with regulations.
When you’re ready to dispose of the contaminated materials, wear protective gear such as gloves and masks to safeguard yourself from mold exposure.
Seal the materials in plastic bags or containers to minimize spore release during transport.
By following these steps, you not only protect your home but also contribute to community health and safety.
Clean Surfaces Thoroughly
Cleaning surfaces thoroughly is crucial in mold remediation, as it directly impacts the success of your efforts. When you encounter water damage, mold can quickly take hold on different surface types. That’s why you need to act fast and use the right cleaning solutions to eliminate mold spores effectively.
Start by identifying the various surfaces in your home that may have been affected. Different materials require specific approaches. For instance, porous materials like drywall and carpet may need to be replaced, while non-porous surfaces like tile and metal can often be cleaned and salvaged.
Here’s a quick guide for effective surface cleaning:
Choose the Right Cleaning Solutions: Use mold-specific cleaning solutions that are proven to kill mold spores. Be sure to follow the manufacturer’s instructions for best results.
Scrub and Rinse: For non-porous surfaces, scrub with a brush to remove mold. Rinse thoroughly to ensure no residues are left behind, as these can promote regrowth.
Dry Completely: After cleaning, dry the area completely. Mold thrives in moisture, so ensure there’s no lingering dampness.
Use Natural Mold Killers
Natural mold killers offer an effective and eco-friendly alternative to chemical solutions for tackling mold in your home. Many homeowners are increasingly seeking natural alternatives, not just for health reasons but also to foster a sense of community and shared responsibility for the environment.
By incorporating natural mold killers, you can effectively manage mold growth while aligning with eco-conscious practices.
Essential oils, for instance, are powerful allies in your mold-fighting arsenal. Oils like tea tree, lavender, and eucalyptus possess inherent antifungal properties that can inhibit mold growth.
To use them, simply mix a few drops with water in a spray bottle and apply it directly to affected areas. This method not only targets mold but also leaves your space smelling fresh, fostering a comforting atmosphere.
Another effective natural alternative is vinegar. Its acidic nature makes it a formidable opponent against mold spores.
You can spray undiluted white vinegar onto moldy surfaces, allowing it to sit for an hour before wiping it away. This simple approach not only eliminates mold but also prevents its recurrence.
Baking soda is another versatile option. It can be mixed with water to form a paste, which you can then apply to moldy areas.
Once it dries, scrub it off to remove both mold and odors, promoting a cleaner environment for you and your loved ones.
Apply Anti-Mold Solutions
When you encounter mold in your home, applying anti-mold solutions is crucial for effective remediation. These solutions can help eliminate mold spores and prevent future growth, ensuring your living space remains safe and healthy. It’s essential to choose the right products for your needs.
Anti-mold sprays are widely available and can be quite effective in treating visible mold. When selecting a spray, look for one that specifically targets the type of mold you’re dealing with. Make sure to follow the manufacturer’s instructions for application to achieve the best results.
In addition to commercial sprays, you might consider using essential oils, which offer a natural alternative. Some oils, like tea tree or lavender, possess antifungal properties that can help combat mold. You can dilute these oils in water and spray them onto affected areas, creating a pleasant scent while tackling the problem.
Here are some tips for applying anti-mold solutions effectively:
Target Affected Areas: Focus on places where mold is visible or where moisture tends to accumulate.
Follow Safety Precautions****: Wear gloves and a mask to protect yourself from mold spores and chemical exposure.
Test a Small Area First: Before applying any solution, test it on a small, inconspicuous area to ensure it doesn’t damage surfaces.
Control Humidity Levels
Maintaining optimal humidity levels in your home is essential for preventing mold growth. High humidity creates a favorable environment for mold spores to thrive, increasing the risk of health issues and structural damage. To keep your home mold-free, focus on effective humidity control strategies and consistent humidity monitoring.
Here’s a simple guide to help you manage humidity levels:
| Action | Recommended Humidity Level |
|---|---|
| Use a Dehumidifier | 30%-50% |
| Ventilate Properly | 40%-60% |
| Seal Windows & Doors | 30%-50% |
| Monitor Indoor Plants | 50%-60% |
| Fix Leaks Promptly | 30%-50% |
Dehumidifiers are particularly effective in damp areas like basements or bathrooms. Aim to keep humidity levels between 30% and 50% to create an inhospitable environment for mold growth. Be sure to ventilate areas prone to moisture, such as kitchens and laundry rooms, to allow air circulation.
Regular humidity monitoring is crucial. Use hygrometers to check humidity levels consistently. If you notice readings above 60%, take action immediately. Consider using exhaust fans in areas that generate moisture, and if necessary, invest in high-quality insulation to combat humidity issues.
Monitor for Recurrence
After implementing effective humidity control measures, it’s important to keep an eye out for any signs of mold recurrence. Regular monitoring can help you catch mold in its early stages, preventing further damage and ensuring a healthier living environment.
To do this, familiarize yourself with common mold recurrence indicators and adopt reliable monitoring techniques.
Here are a few key indicators to watch for:
Visible Mold Growth: Check for any new patches of mold on walls, ceilings, or other surfaces.
Musty Odors: A persistent, damp smell can signal hidden mold growth in areas that are hard to inspect.
Water Stains: Dark spots or discoloration on surfaces may indicate moisture problems, which can lead to mold.
Incorporate regular inspections into your routine. Set a schedule to thoroughly check areas prone to moisture, such as basements, bathrooms, and around plumbing fixtures.
Use a moisture meter to assess humidity levels in building materials; this can provide valuable insights into potential mold growth conditions.
Additionally, consider utilizing air quality monitors to detect elevated levels of mold spores in the air. This proactive approach can alert you to issues that mightn’t be visible yet.
Seek Professional Help
In many cases, addressing mold issues independently can be overwhelming and potentially hazardous. If you’ve experienced significant water damage, tackling mold on your own may not be the best choice. Mold can pose serious health risks, and its growth can be extensive, often hiding in places you can’t easily see.
That’s why it’s essential to consider professional help when you’re dealing with mold.
Professional mold inspection can provide you with an accurate assessment of the problem. Experts are trained to identify mold types and locate hidden infestations, which you might overlook. They use specialized tools and techniques to detect moisture levels and mold spores, ensuring a comprehensive evaluation.
Once the inspection is complete, they can recommend appropriate remediation services tailored to your specific situation.
Remediation services tackle mold growth more effectively than DIY methods. Professionals have access to commercial-grade equipment and eco-friendly products that ensure thorough removal while minimizing health risks.
They also follow established safety protocols to protect your home and its occupants. By choosing professional help, you’re not only ensuring a safer environment but also saving time and stress in the long run.
Review
In conclusion, addressing mold after water damage requires a proactive approach and consistent effort. By identifying affected areas, ensuring proper ventilation, and controlling humidity, you can effectively combat mold growth. Are you ready to take these essential steps to protect your home? Regular monitoring and maintenance not only safeguard your space but also promote a healthier living environment. If the problem persists, don’t hesitate to seek professional help to ensure complete remediation.